Saturday, July 24, 2021

Sandcastles2stamp card


 Here is another TSOL Sandcastles2stamp card.  I love this stamp set.  I made the palapa using the Circus tent fold-it from TSOL’s Life’s a Circus Online class ( which is now Sold out).  


 “How I made this” A2 card 5 1/2” x 8 1/2” card base scored at  4 1/4”

1- 4 1/3” x 5 1/2” cantaloupe c/s

To make the palapa:

I cut out my Circus tent in gingersnap c/s.  I then did it again using my kiss cut pad from TSOL.  

I then inked the c/s with gingersnap ink and a blender brush.  I cut off the scalloped edge and removed some of the pleated edges to fit on the size of my 4” x 5 1/4” powdered sugar c/s   (To determine how many pleats to remove-I placed it on the c/s and decided how large I wanted it to be)  I removed 3 on both sides.  I then cut 4 thin strips for the legs. The sand is made by tearing the paper and layering it.  I inked the top of the paper but 1st I washi taped a line not to go past- then using my TSOL (sky ink) & cloud/ hexagon stencil  I started making clouds on my powdered sugar c/s.   After making the clouds I made a very thin line with 2 pieces of washi and using ocean ink I filled in that VERY thin line….removed the bottom piece of washi started making the ocean.  Using ocean ink and I went down the paper and then I went back using the TSOL wave/sun stencil to make waves.  Then I added 3 pieces of torn gingersnap paper for the sand.   

I paper pieces the palapa together using the kiss cut pulapa and the die cut one on top. I put used glue to put the top on my palapa…added the legs- shorter legs in back suck into the sand and longer legs in front. Then decorated it with the paper pad from the TSOL Card Kit paper pad.  

I added a piece of twine with a knot tied on both ends across the bottom of the pulapa and stamped out sea shells for the twine.  Colored and cut out the shells and glued them for decorations on the twine.

I used powdered sugar ink on the wave for the foam of the sea and 3’d ink on top.  

Have fun making this card.  And be sure to share it for all to see. 

Enjoy๐Ÿ’•

Thursday, July 15, 2021

5 cards made using The Stamps of Life Card Kit Club July 2021

 The New TSOL Card Kit is here and The Stamps of Life DT has been busy making you cards using this Amazing New Kit.  Here are the 5 fun cards I have made for you. As you probably already know the Stamp and Die set for July was the Sandcastles2stamp  & dies.  Every month on the 15th, TSOL introduces the New Card Kit that goes along with the Stamp & die set.  This months set is called “Summer Lovin’”. And this one is Awesome. The link to check out The Stamps of Life is:  www.thestampsoflife.com 

Below is what I made and I then I will list how I made it…

Summer Lovin’ card A2 card 4 1/4” x 5 1/2”


This what I used:

A2 size card 4 1/4” x 5 1/2” 

Background paper us whichever ones you want they measure:

1- 1” x 5 1/4”

1-  3 3/8” x 5 1/4” glue p/tape these two pieces go together to make the background paper. Then use the ribbon and twine around the seams1- 1 1/8” x 4 3/8” paper.  I used my stitched rectangle for this paper.


I  then  cut the Summer Lovin’ words and sand castle. I used pop dots to pop up the layers. 

On the lemonade c/s I used the sunburst2stamp background stamp.


Summer Scene Card A2 size card


Base piece of c/s measures 4 1/4” x 5 1/2” Frame is the Scalloped rectangles the largest and next one down but u can make ur frame as large as you want. I made it into a shaker card using acetate the same size as the largest frame.  I decorated the top of the acetate and attached the frame on top of the decorations.  Then added the frame on top of the decorations with tape.  The Summer Lovin’ I cut out of the paper pad and added a frame around it and popped it on top of the acetate.  Lastly I used powder on the paper and on the acetate so the sequins will not stick.  Then added doubled sided thick tape -used the powder on the inside of tape -added the sequins- and added  the frame.

********


Beach card A2 card


Beach cardA2 size card 

Background paper 4 1/8” x 5 3/8”Next layer 4” x 5 1/4  I used the Summer Lovin’ paper and used gingersnap at the bottom.  I hand tore the top of the paper to make it look like sand and added marker dots for texture.  Using my stitched rectangle dies around the word beach I cut a frame. Filled in around the word beach with the purple cord ribbon and added a bow.  Then add my decorations.  Inside this card I left blank for writing. 

********


Summer Card A2 size card 


1-Background paper measures 4 1/4” x 5 1/2”
1- Layering piece 4 x 5 1/4”
To make the netting on the buoys I used the lattice background die and inked it up wit gingersnap, twig and chocolate and of course the 3’d ink pen sparkly one. 
I used  glue dots & glue to hold it down. 
I  piece of gingersnap c/s about 1 1/2” x 5 1/4” and hand tore it all the way across to make it look like sand  and also hand cut a piece of sea glass c/s to make it look like the ocean.  The top of the powdered sure c/s I used the cloud stencil with sky ink to make the sky and the layered the ocean and sand at the bottom.  I used glue but u can use whatever you want to.  I used the palm tree from the island2visit and embossed it with the 3 ‘d ink pen.  Used the sandcastle from the paper pad along with the pail anc starfish.  The castle I used the majestic stencil with chocolate ink.  

********

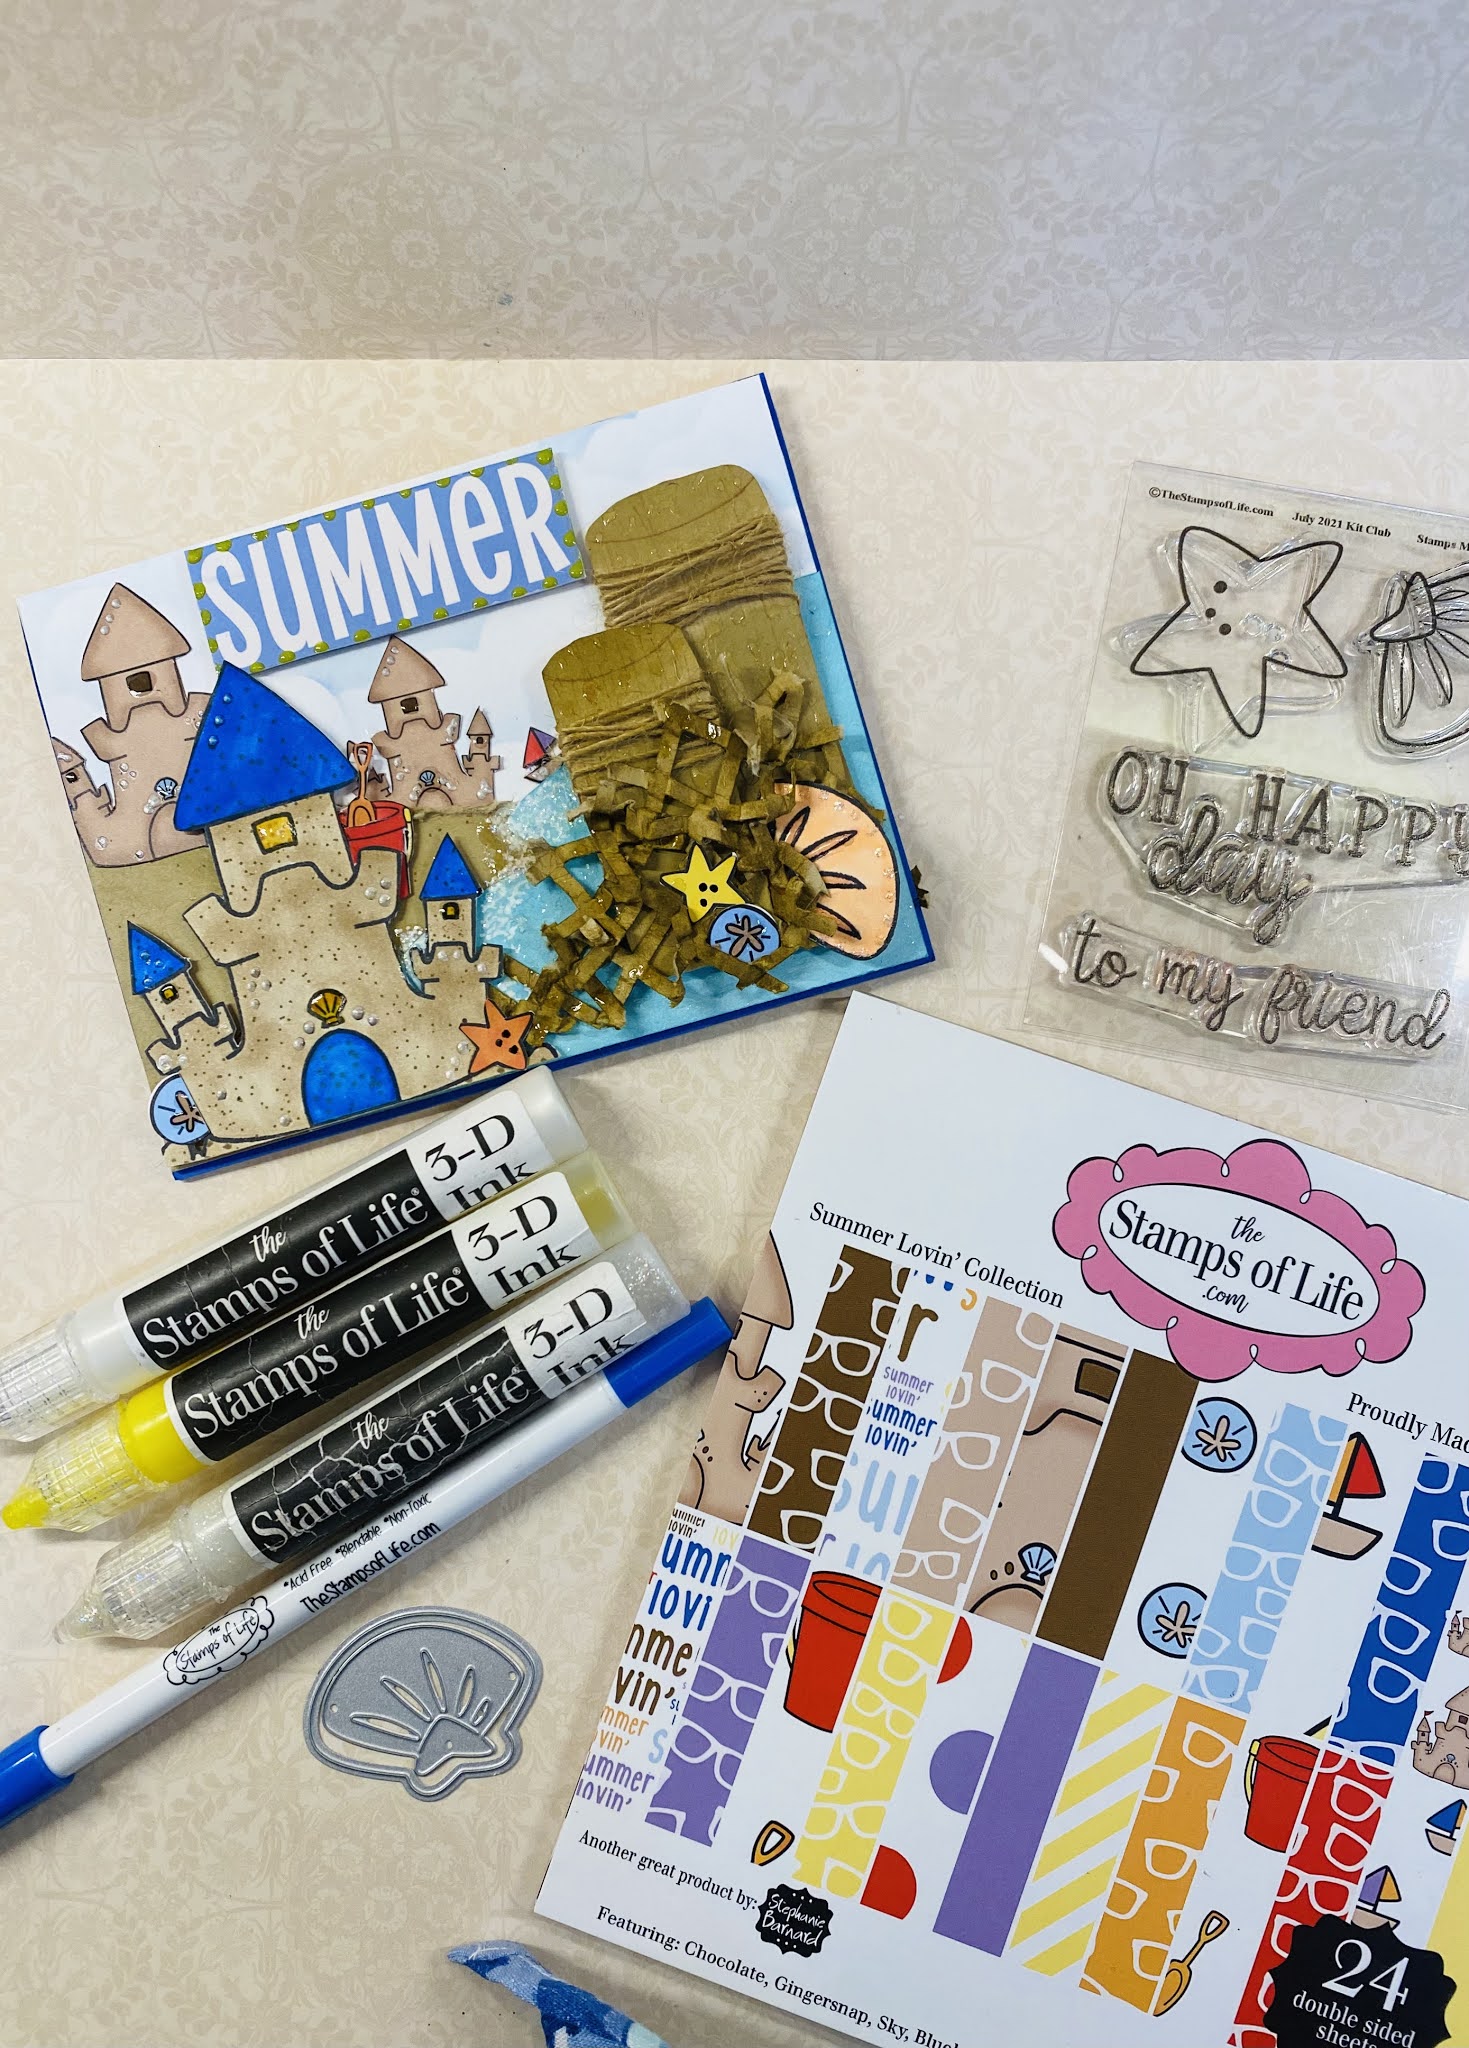
Summer castles A2 card


The background paper is blueberry c/s & measures 4 1/4” x 5 1/2”. 
The powdered sugar c/s is 4 1/8” x 5 3/8”
I layered the whole scene on top of the Powdered sugar c/s.
The sand castles, starfish, & pail I cut out from the paper pad.  The buoys I drew them on gingersnap paper and inked the paper. We’d it with twine and inked the twine.  Cute some of the paper from leftover lattice from the card above and scrunched it up and glue doted it down.  Added 3’d ink pen with powdered sugar in the water to make it look like foam. And added a sail boat.  Super fun and easy card. 

I hope you all enjoyed these cards I know I had so much fun making them for you to enjoy.  If you have any questions please ask.  I check back often  

To see Dania’s Doodles Instagram video for the Summer Lovin’ cards you can see it here:thihttps://www.instagram.com/p/CRXPQV_pCBo/?utm_medium=copy_link

Wednesday, July 7, 2021

4 New Releases and there on FLASH SALE

Hi Everyone 

 Have you already seen the New products released by The Stamps of Life?  If not I will post the latest TSOL video below.  These New stamp and die sets are so much fun, and so CUTE.  And I heard Stephanie say there is MORE to come…and I just already know that and I will let you know you will not be disappointed ๐Ÿ˜„ I will also post below my Little Peeps Giraffe card with what I used to make this card.  I hope you like it.  Here is the link to Stephanie’s video. 

https://youtu.be/XivEqK2F7d4 

And below is my Little Peeps Giraffe card with everything I used to make this cute little giraffe. I had so much fun making this card 

Enjoy ๐Ÿ˜„


For this card I used the mini slimline dies.  I was wanting to make a little taller card and since the giraffe was already a taller image and I was wanting to make  him flying a  kite that was my reasoning for the taller card but not a slimline tall card. The background is the TSOl cloud and hexagon stencil with sky ink and a blender brush. I ink blended the grass with green apple ink and then added the grass along the bottom using the TSOL grass “Border dies”. The kite is from Kite2stamp sand dies.  I love this set…see all the swirled background stamps.  I just love those.  All the ink colors I used are  from the TSOL markers…banana, sky, gingersnap, chocolate, and licorice. I used a water brush to blend the colors.  I love to water blend with TSOL markers. 
The birds are in the TSOL Lighthouse2stamp set…I cut my birds apart and placed them one by one.  And last but not least the ribbon.  I LOVE the thin ribbon and it worked great for the tails on my kite.  Pretty easy card to make and lots of fun to make also.  I hope you like it.  
Have a wonderful day!
Cheryl
(The white around the dots are from a white gel pen I have in my stash)


Thursday, July 1, 2021

It’s Here…

 Sandcastle2stamp is the NEW July club set 2021

Be sure to check out the The Stamps of Life’s Newest Monthly club set.  

This one makes me so Happy to welcome Summer back.  

Here is the link to the TSOL website  

www.thestampsoflife.com


What did I use: 
All TSOL products
Sandcastle2stamp & dies
MoreSandcastle2stamp 
Hexagon and cloud stencil (for the clouds with sky ink)
Grid stencil (on the sandcastle)
Lighthouse2stamp stamps (for the birds)
A piece of gingersnap c/s (inked with trig and dotted with the tip of my blender brush to make the sand)
Summer4fun dies (I inked on the paper around where I wanted the sunshine to be and then placed the sun on top of the rays of lite and cut the rays away from the sun and glued them separate from the sun)
Mini ink pads
3’d ink  pens ( for the water I used the white and the glitter pen)
*I bought 2 sets of the pack 1 3’d inks. The glittery pen one I store flat side down so the ink comes out with no sparkle and the other one I store tip side down so it comes out glittery)
Markers 
Pleas follow my page if you like it.  I will be posting the New club set cards here with “What did I use” instructions 
Enjoy๐Ÿ’•

Tuesday, June 29, 2021

TSOL’s Rolled Flower die

 I will Never forget when TSOL came out with the “Rolled Flower die”.  I was watching The Stamps of Life video when Stephanie had it on the air and I wanted that die that very second I saw it…of course I had to wait.   Then it came and I started immediately making this card.  This card is super easy after you make ur 2nd flower and trust me-you will not forget how to make them.  Use a bone folder to curl them before you start-use it very gently so you do not break the flower   I use glue to put them together but use whatever is easiest for you  once you make the first one the 2nd one will be easier and then you will be a pro.  The card is super easy to put together after you make the flowers.  Just by looking at the card you will be able to put it together.  Hope you like this fun card  

www.thestampsoflife.com

Enjoy

Cheryl


Monday, June 21, 2021

5 cards using the June 2021 Stamps of Life “You Got This” Card Kit

 Good Morning Everyone!

Our DT’s here at The Stamps of Life have been making some really cute cards using the June card kit that came out on June 15, 2021. Some of the DT’s will be posting videos on YouTube/Instagram and or posting cards with info of how they were made on their blogs.  Be sure check them all out.  I will be posting here “what I used” to make these cards.  I will be posting pictures of all 5 cards I made and if you have any questions please ask.  So let’s get going with the cards. Everything I used is from The Stamps of Life Card Kit which is a monthly club you are able to join.  The 1st of each month TSOL comes out with a NEW Stamp and Die set which is also a club set.  Go on over to the TSOL website and check them out.  www.thestampsoflife.com


A2 card 4 1/4” x 5 1/2”  layering piece is largest scalloped rectangle die. Frame is the next 2 below the largest.The white frame is #5 stitched rectangle.

Here is what I used to make this card:

Everything I used to make this card is in the card kit along with the except the  TSOL scalloped rectangles and the stitched rectangles.  I use them together to make a frame.  The card stock and pattered paper comes with the kit.  The border stamp on the scalloped edge rectangle is called the  “quick2border”stamp set by TSOL.  Use whatever paper you want and it will be super cute.

A2 size card 4 1/4” x 5 1/2”  

Layers largest scalloped rectangle die- the 6th & 7th stitched rectangle dies. The patterned paper is from 

the paper pad and I used the 6th stitched rectangle die for the cookie but you use 

whichever paper you want 


This card I called the Hooray love cookies card.  I also used some of the stamps from the monthly Stamp and die club sets.  The CUTE Cookie paper is in the 6x6 pattern paper that comes with the kit.  I also used the scalloped border dies from TSOL and the 3’d gel pens on the edges…tip when using the gel pens make sure to let them dry for at least 6-8 hrs it keep there shape.  Again I used the stitched rectangles and scalloped rectangles together.  Pretty easy card. 
*******

This is an A2 size card. The frames is made using the stitched rectangles dies #8 & #9 (the 2 largest dies cut together makes the frame. I cut 4 of the scalloped boarders and put it around the inside of the frame.   Use the #8 die from the patterned paper “you got this” for the larger cookies.  Use whatever paper u want.  Then I hand cut out all the cookies and used dimensional tape to make it stand up (the hearts on the cookie paper). The ribbon is in the card kit.  I used 3’d gel pens to make the dots on the scallops and I put the 3’d sparkly pen on the bow. 


********

This card was pretty simple.  Using another piece of the patterned paper I colored the frame using the mini ink pads.  Cut out some of the cookies and hearts popped them up and then used the 3 ‘d gel pen for dimension and little dots to make the back ground pop.  Again I used the scalloped edge die to outline the edge of the frame.  If you don’t have the die you can use whatever you already have or outline it with a marker.  I wrapped the ribbon around the back of the frame and tied a bow in the front then used the 3’d gel pen to make it shine.  The sentiment is in the Cookie2stamps club set.  

A2 size card 4 1/4” x 5 1/2”  layering piece (bubblegum)  is 3 3/4”  x 5 1/2”.  

1- 3 3/4” x 5 3/8” quava c/s

2= 11/16” x 5 3/8” pink hearts 

1-2 1/8” x 4 5/“ white c/s

2- scalloped boarder dies (yellow c/s)

Ribbon from TSOL

Use any greeting you have to go across the top  


This card I called the mixer card.  This card I used the patterned paper and cardstock  again in the kit.  I die cut the mixer out of the patterned paper  and used the cookie paper again  I jus layer the papers and popped each layer up with dimensions but if you don’t want to pop it up you don’t have to.  It will look cute either way.  The saying is in the kit but I did use a banner die for the saying.  And I framed it to the banner die then stamped it so the curve would be inside the frame.  Again I used the ribbon from the kit  and the 3’d gel pens.  Love this card  

Here are the measure or this card:  This is an A2 size card and I added a piece  of heart pattern paper to the top of  white 4” x 5 1/4” .  Then I added a piece of pattern paper 1 1/4” x 4” & glued them together   Made a straight edge board and used a die for the bottom edge then added the words that came in the card kit  

To decorate the top I used the circle dies and the large cookie die from the card kit   Used whatever size circle you want from the circle dies   


Again I used everything from the card kit but also from the Cookies2stamp set and dies   As you probably have noticed about the clubs -the club set match with each other.   So the Stamp and die club go with the Card Kit club.  So everything you get with these club set you can use with everything   I LOVE that.  This card I used the “you got this” dies from this set. I also used another TSOL die to make a border that I had in my stash.  But use whatever you have on hand.  You could even cut a piece of patterned paper to put across it   I hand cut some of the mixers from the patterned paper and add them to the striped paper and added a bow   Everything was from the kit   You will be able to make more than 10 cards with this kit and all you need is a die cutting machine, scissors and tape.   Everything else is in the kit.   Hope you enjoyed these cards.  Thanks for joining me.  Please leave a comment …I Love to read them.

Enjoy 

Cheryl ๐Ÿ’•

*** on the paper sizes…my cards are A2 (4 1/4” x 5 1/2”) unless otherwise noted.   Layering piece for the A2 size cards are usually 4” x 5 1/4.  If using a square, rectangle, & circle, die(which includes scalloped edge of any of these) I use whatever one I thinks looks good on the card   Sometimes I choose the one right next to it in size and other times I make it larger but skipping one or two or even 3   You can usually tell buy looking at the photo.  I usually ALWAYS use foam tape on frames or on the items for dimensions. If you have any questions …please ask me…I am always willing to tell you if you need help.  ๐Ÿ’•


New month New releases

 Hi Everyone๐Ÿ’• Can you believe it’s already July?  This year is just flying by so quickly…and with a New month The Stamps of life has releas...