Saturday, April 2, 2022

TSOL By the Sea Kit is now Available

 Hi Everyone 

The Stamps of Life NEW “By the Sea” kit is now available.  This kit is packed with the best New product to make the best card and crafts.  Here is the link to see the kit: 

http://thestampsoflife.com/by-the-sea-kit.html

www.the stampsoflife.com

Here are  some of my cards I made using the kit. 


I LOVE this kit.  I think this makes my Favorites list AGAIN. πŸ’• This kit will not last long 

Happy Stamping. 

Cheryl

Sunday, February 27, 2022

Explosion box heart sides


Hi Everyone, 

I have had some questions about how to make the heart sides on my explosion box.  Here is how I made them: 


I used scissors, ruler, bone folder and an embossing tool w/ my paper trimmer  

Cut 2 of the TSOL Explosion side dies. (The largest die with the 3 sides)


Cut 4 of the largest hearts from the TSOL dotted hearts die set ( if I was you I would make the first one out of notebook paper to create a mold… it makes it easy after you make the mold)


Fold 1 of the largest hearts in half.  Make sure all the dots line up perfectly.  Use a bone folder for a hard crease.*see picture


Placing the bottom point line the heart to the center of the 2 squares . (See picture).  

Now is when u decide how much you want to show when the box opens up.  Pull the bottom point down equally on both sides.  The heart should begging to hang over onto the pink c/s.   I wanted mine to be shorter than the top of my box so I went down about 1/2” on each side. Measure it. Now when everything is lined up softly using a pencil draw lines to make a small BOX on the bottom  I put some washi tape to hold it in place *see photo


This is how the front should look.  The back should be clean…look below


Once everything is centered -now is when you can glue the edges down onto the c/s sides and even the little box at the bottom.   Let dry.  After glueing the edges use ur embossing tool to make a hard line down to the center point and across.  Now hard crease those lines.  Open it gently pressing the fold lines inward. You will have to connect the box to finish.  Then do each of the 3 sides just like the first one.  Then you cover the edges with the square die that comes in the kit. 


Once you put the hearts on all four sides gently press them toward the inside of the box. Then finish the box however you want.  Hope this helped you make my explosion heart side box.  Please send tag me in a photo I can’t wait to see them.  Any questions just send me a note πŸ’•

 Enjoy

Cheryl

FYI:   I made a pattern out of one of the hearts for me to keep so it will be easier and faster next time  next time.πŸ’• 


Friday, February 11, 2022

“NEW” TSOL Explosion Box


Hi Everyone,  Here is the box of candy I made using the NEW Expoding Box and the Heartchocolates2stamp Double set.  I thought you would like the instructions as it was to long for me to post on the gallery.  I will also post these on my Creating_Blessings TSOL blog.  www.thestampsoflife.com

https://thestampsoflife.com/explosion-box-dies.html

How I made it:

Lid : cut, hard press and glue together. I decorated this box now but you can do it whenever you want to.  Set aside (I decorated the box lid with the dies in the 4x4 Square card bundle)

Side die thingy:

I cut 3 total  1 you use to connect the top and bottom box together and the other 2  I cut the the ends off to be straight and cut them to be the 1” the sides of my box. I cut the tabs off so the ends are straight across.  Do a hard press on the score line and set aside.  (If you make ur box taller than mine you may need to cut more side thingys and adjust them to that height of your box).

Cut 2 exploding boxes.  Decide how tall you want your box to be.  As you can see I wanted mine to be a box for candy so mine is short.   For mine I wanted my sides to be double sided to be more sturdy and clean looking inside. So here is how I made mine. 

I cut my sides to 2 inches and scored them on all 4 side at 1” (hard press the score lines).  Now put together the box…using the side thingys on the inside of the box I glued one on the bottom half of the flap in all 4 corners. Now the bottom is ur box.  Now fold the top pieces of paper down inside the box and glue the sides inside if you want. This should be a tight fit ( if too tight cut a little off so the fit is snug but corners are just a good fit.). Add a little glue now if u want.  The corner thingy to put ur box together with you won’t even see. 

Now using ur 1 long side die that you cut the regular size I glued my 2 boxes together.  On side of the die on the bottom and one side on the top.  And now your box has a lid and bottom.  

So now is when the lid and bottom go together.  You need to add the next step so the top lid has a place to rest on. AND this I think was the hardest thing for me.  I added a piece of paper to the inside for the lid to have a resting place for when the lid closes.  It sits is 1/4” taller than the box itself.  The reason I made this resting place for the lid longer is if you need to cut some off it is easier to have it made already.  And it is the corner that have to be inset in perfectly.  Maybe making it a single piece of paper might be easier. I doubled mine next one I will try a single paper.  

I cut a 2 1/2” x 9 1/2” scored at 1 1/4” (To make it 9 1/2” I cut a 2 1/2” x 1” piece of c/s and taped it to the underneath side flush up against the other piece of c/s).  Now hard press the score line.  

Now for me this next step was the hardest thing to do. 

 The resting place fits inside the box.  (My seam is along the back side). You put yours where it is best for you.  I put the long strip inside the box and with my bone folder I pressed it into the corners on all 4 corners.  Hard pressed on all 4 seams.  You may have to play with it a little to get a tight fit into all the corners. After you get in in cut off some of the excess paper.  I then opened the paper and glued the 2 sided together and the using glue I glued it to the inside of the box.  Let it dry. 

If you want to add the candy like I did inside my box I made a little stand for the inside of the box for my candy to sit on. I measured the inside edge to edge (I wanted it snug so it should not move)  then I added 1/2” on all 4 sides for height.  Scored 1/2” on all 4 sides and cut up 1 of the score lines on each square in the corners.  Glue ends to make it litle a tray.  And put it in your box.  Decorate it with whatever you decide.  I used the heartschocolates2stamp club set.  Any questions just ask.  

Enjoy

I loved this project I hope you do also. 

Cheryl πŸ’•

Thursday, January 27, 2022

Chocolate2stamp & Morechocolate2stamp card


This was a card I made using the The Stamps of Life December 2021 Chocolate2stamp stamps and dies and Morechocolate2stamp stamps and dies.  This card took more prep work than anything bc everything had dry time   So when I made these cards I made ALL the candies first.  I stamped the candies-let them dry and added 3’d inks to each candy(let them dry over nite then cut them all out.  The ink colors I used was chocolate, twig, gingersnap,candy & powdered sugar.  The 3’d inks I used were white & pink.  I colored the white after they dried with alcohol makers to make the different colors of browns, tans and dark chocolate.  (Set aside)

To make the word strip I used chocolate ink and my misti to make the line straight.  I stamped it on a 3/8” x 5 1/2”  powdered sugar strip.  The candy strip is 1” x 5 1/2” and the Chocolate c/s is 1 1 1/8” x 5 1/2”.  Layer the PS using dimensional tape in the middle of the candy and then put them tougher leaving the 1/8” to show on the right side.  (Set aside)

Cut 1 4 1/4” x 5 1/2” candy c/s.  Use  powdered sugar ink  with the TSOL majestic stencil on the candy c/s.  (Set aside to dry)

I used the TSOL Scalloped circle dies for the scallop.  The dotted circles for the Candy and chocolate c/s.  To figure out the size for the chocolate circle just put ur candy pieces inside the circle and the use the next size circle (candy) and then the scalloped circle   That is how I got the size of the circles.  After putting that together start putting ur card together   

Everything goes on the candy c/s with the stencil.  First glue or tape down the left size strip word piece,  Then add the candy piece.  Trim off the sides to make them straight.  I made the saying at the top and added a chocolate bow.  (Use which saying you want)

After I finished I attached the Candy paper to a Powdered sugar card base.  The small piece I cut off the front candy piece I used on the inside of the card and added some of the words on the left side.  

This card is really not hard it’s the drying time that took the time.

Super fun card to make 

Enjoy  


Wednesday, January 19, 2022

NEW January 2022 Card Kit cards

 Hi Everyone it’s time for TSOL’s 2022 January Card Kit club cards.  I LOVE this months Kit   The New A 1 Center Step Flip-it Die is out of this world Awesome.   It’s so Easy to use and Everything in this Card Kit works perfectly to make the Best cards.  So let ps hop right in and see how easy they were to make   

For this card everything I used for this card except for the 3’d ink pen.

First I picked my paper

I used:

Cloud for the card base 

Blue jay for the layering front piece (Glue it down)

Powdered sugar for the layering square (Glue it down) 

Now the top candy piece-this piece I used dimensional tape to the back after I assembled it to pop it up. 

Candy for the top square and I used the dotted square at the bottom of this piece and only cut it about 1/3 up from the bottom.  Then I took a small piece of pixie and added it behind the dotted square and cut a tiny piece of pixie to add separate it from the candy. 

Now cut your 2 side pieces and glue them in place  

Make some flowers with the flower dies ( I made 6 total for this card). I used pool, razzleberry, and blue jay…the stems are green apple.  Cut out 12 individual  flowers using the large and small flower with stem die (don’t worry if the don’t line up they still look cute.  Then add a center from the small flower center die of ur color choice). Glue 2 flowers together   I used both sizes of flowers on either size stem but change it up if you want.  Glue 5 flowers on the front.

I now cut another piece of paper for the bottom out of pool.  I just took that die with the edge and cut only the bottom piece out of pool and then added it on top with dimensional tape.  I did shorten the sides a little to see the blue jay c/s.  

Added some ribbon, some stars, colored the pink rhinestones with my black so trim noir alcohol marker and used the sparkly 3’d ink pen. 

Super easy Super fun card…I love cute and easy  don’t you.πŸ’•

EnjoyπŸ’•


*****

Card #2

For this card it is made the same way as the above card except the decorating is different. On this card I changed the paper to a Pool card base.  I used the green apple  and striped from the See You Soon Collection paper pad.  (This is such fun paper- I LOVE it).  I used the typewriter sticker and added dimension tape to the back side of each typewriter I did the same to the saying at the bottom of the card.  I then added a bow on each of the sides and added some of  TSOL’s Shinny Yummies hearts from set 1.  

Decorate the back if you want adde some 3’d ink pen. Remember to let the 3’d inks dry for at least 12 hrs. 

Super cute and another easy card πŸ’•


*****

Card #3

This card I made exactly the same as the 1st 2 cards except I changed up the paper and the decorations.  

I used bubblegum c/s as the base.  For the layer pieces I used candy and razzleberry. The black dotted die piece I cut using licorice c/s and the dotted die and layer it into the center.  The words “See You Soon” are cute 3 times and layered. 2 cuts I used powdered sugar c/s and the top piece I used TSOL white glitter paper.  These 2 flower decorations I used the leaves dies along with a flower -made the same ways as in card #1,  I cut sided of the razzleberry die paper down a tiny bit on both sides, the bottom and the top so the back paper (bubblegum)  was a little bit bigger the layer them all using dimensional tape on the back of the razzleberry for depth.  Added the razzleberry checked ribbon on the side to make the bows.  Added the pink rhinestones at the bottom ends and on the flower centers and then added my 3’d ink.  I LOVE TSOL’s 3’d inks…if you don’t already know that πŸ’•
Super Easy card and I think it’s Super Cute πŸ’•
Enjoy,


*****
Card #4

Here is a card I made using the NEW A1 Card base and I added a frame to this card using the New TSOL Inside Scalloped Rectangle die set.
I cut a card base from powdered sugar c/s and the A1 card base

1- 4 3/4” x 3 3/8” razzleberry c/s (use the layering die that came with the A-1 card base) glue to the card base
1- 3 3/8” x 4 1/2” black alphabet pattern paper in the “See You Soon” collection -add a piec of ribbon to this paper and adhere the ends to the backside of the paper then center it and glue to the razzleberry c/s

The Frame:  I cut 3 medium size frames from the Inside Scalloped Rectangle die set…2 from powdered sugar c/s and 1 from TSOL white glitter paper and with glue layered them together leave the glitter paper on the top.  Then I add dimensional tape to the back and centered it to the card. 

I hand cut a shadow piece of white c/s to the typewriters and the popped them up with dimensional tape and centered them inside the frame.  Added a bow on the side from the razzleberry checked ribbon.  Added rhinestones to the corners and the “hello” (from kit)  to the front at the bottom. 
Then of course I used the 3’d ink pen to sparkle it up. 
FYI the 3’d inks come in many colors. There are 2 packs to choose from.
Super easy and fun card to make πŸ’•


Enjoy
*****


 Here is another Super Easy and fun card to make. Everything except the card bas is in the kit and the card base is on the TSOL website and available to purchase if you don’t already have it. 
The die is call The Stamps of Life Square Flip-it Die Set.  

1-card base cut from licorice c/s
Card sides- I used the paper is See You Soon from the TSOL January 2022 Card Kit
I used the “See You Soon” paper for the smaller side 
The razzleberry alphabet paper for the right side
In the middle square I used a saying from the squares that came in the card kit
I cut a square from the card base dies for the inside of the card from the See You Soon patterned paper.
(I used the striped paper) glued it down and then made the words for the square. 
See You Soon I cut and layered it 2 times one layer licorice the other Black TSOL shimmer paper-glued together with shimmer paper on top and added it to a pixie shadow from the kit.  
Decorated it with the pink rhinestones from the kit and the stars.  Along with another flower I mad from pool and green apple c/s. Added a bow and I did add a piece of powdered sugar c/s w another flower onto the back of the card that I cut to be smaller so the edges would show thru to the front of the card (picture shows it). 


*****

I hope you Enjoyed these cards I made using the TSOL January 2022 Card Kit. 
To see this kit you can find it here:  https://thestampsoflife.com/clubs/

www.thestampsoflife.com


Tuesday, December 14, 2021

NEW Release Telephone Fold-it

 Tonight’s New Release is on Flash Sale…theTelephone Fold-it.  Super easy and makes All kinds of cards.  Check out The Stamps of Life website and see the New releases that just came out.  

www.thestampsoflife.com

T


Remember Flash Sale items are on Flash sale for 24hrs or until it’s sells out.  

Friday, November 19, 2021

5 New cards using the New November 2021 “Yippee” Card Kit

 Hi Everyone πŸ’•

Here are my cards I made using the November “Yippee” card kit.  And I will be using the New A1 card base dies we got for this month.  Mostly Everything I used for these cards you have in the card kit. 

You can find these products here at the Stamps of Life website:  https://thestampsoflife.com/

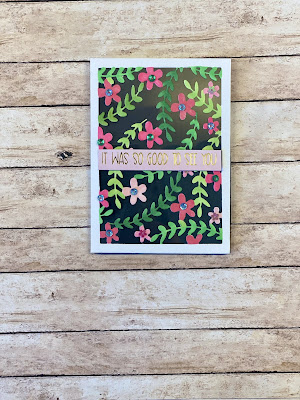
 Super fun kit. I Love it.  Here is my 1st of 5 cards πŸ’•


This 1st card is a shaker card.

  The sequins I used were the candy cane, citrus fun, and aqua dreams.  

The 3’d ink pen I used was the white pen. Then after the dried I colored them whatever color I wanted them to be.  Mine were yellow and green. All the rest of the flower centers are the blue crystal from the card kit.  If you wanted to use all crystals you could do that instead.  

I cut the “Yippee” die words (3x’s) from blueberry c/s then glued each of them together to get a stack.  I then cut  the background paper from a piece of white glitter paper.  Put glue on the back of my yippee stack and put a large stamping block on top to let dry.  Set aside

Now using your New die set I cut from powdered sugar c/s the card itself and set it aside.  Using one side of that die I used it to cut 1 paper out of poppy c/s.   (On the poppy paper the center line only scores…so I took it to my paper trimmer and cut along the score line).  I then glued it to my powdered sugar card base. 

I then used the smaller rectangle die and cut 1 out of whatever paper u want to be the back side of ur shaker card   

And now I cut the top piece with the vines   I used kiwi c/s  I used the vine die and the rectangle dies tougher so I got an edge around that piece…u need that edge to put ur double sided tape to make it stand up for ur shaker to be able to shake.  This is called foam adhesive on the TSOL site.  NOTE I did not put the foam adhesive on until after I cute the top vine piece…I did not want the vines to stand taller than the acetate.  I ONLY used the foam adhesive around the edges AFTER I adhered the acetate to my kiwi vine paper.   

So here is how it stacked

Kiwi vine paper cut out with edge

I use thin score tape to the underneath side of the kiwi vine paper and then put my acetate upon top of the tape   So it should look like you can look thru it   

I then cut the adhesive sheets into very thin strips and put it all the way around on the acetate (no gapes)

Set aside   

Glue ur patterned paper onto of the poppy c/s  

Now use powder or whatever you use to rub on the paper so the sequins can move around.  Then add ur sequins in the middle of the paper.  

Take you window sheet with the adhesive strips and carefully line it us to the edges all meet perfectly-press down  

To decorate the front of the card I cut blueberry, poppy, cantaloupe, sky and banana flowers using the last die   I then glued them down on top of the kiwi flowers and decorated the centers with the blue crystals or 3 ‘d inks   If you do use the 3’d inks remember to let it dry over nite   

The inside I decorated it with some different colored vines and a saying from Morechalksayings2stamp   

On this card use whatever colors or sayings you want. Super fun card. 

I love this size.  

******

Card #2 A-1 card

Super easy and fast card


Cut 1 A1 card base using the vines and flower extra die from Powdered Sugar c/s  fold on score lines and set aside

Cut 1 piece of licorice c/s  4 13/16” x 3 7/16” 

Cut 1 piece of acetate 4 3/4” x3 3/4” 

Now is the time to color the vines and flowers with ur markers or whatever you use to color with.  Color only to the edge of the powdered sugar paper so it will have a white framed border. 

I used tear and tape to connect the acetate to the top of the licorice c/s edges.  Now is when I connected the licorice to the card base.  When doing that I used tear and tape around the edges and I used gently multi purpose glue to put on the back side of the vines and flowers to connect it to the acetate.  Be sure to not put too much glue,  so it doesn’t leak onto the acetate.  And be sure not to put your licorice and acetate paper to close to the inside fold line.  Just close enough to get a good fold when ur card closes.  You may have to cut off any excess licorice paper if it hangs over the edge 

Now add your sentiment and ur rhinestones and or sequins.  Decorate the inside and add a sentiment. And card #2 is finished.  I know your card is Beautiful πŸ’•πŸ’•πŸ’•

******

Card #3 A-1 card base

Cut 1 A-1 card base from Powdered Sugar c/s


Using the inside rectangle die cut 1 from powered sugar c/s. Set aside

Now I took the inside rectangle die along with the vines die- centered it evenly and cut it out. Now you should have a vine piece of c/c with the frame around it.  Set it aside
Now go back to the 1st rectangle and using ur blender brush blend all different colors for your background.  After you are done set it aside to dry. 
Next using ur sharp scissors gently and evenly cut the vines away from the edge.  Keep the vines and flowers.  You just want an even cut line.  
Now color all the vines and flowers.  Make sure the colors match your back ground paper you made.   There will be some separates vines and flowers that are still together.  Don’t worry about them going where they were-just start glueing them down onto the paper you created. Try and evenly place them and add flowers where there already is one.  Just make it look pretty.  (I cut some different color flowers to go where the other flowers were).  After the background paper has the vines & flowers add clouds from the kit. (Try and stay away from the edge where ur white frame will be).  Add dimensional tape to pop up your frame and pla e it around you picture.  Then add you sentiment-popped up and ur ribbon & ur hearts.   Now is when you used the 3’d gel, rhinestones or sequins whatever you have for the centers of flowers. 

Set it aside to dry.  
Then connect it to your A1 card base.  
Your card is beautiful πŸ’•
******

Card #4 A-1 card base

This card is made just like card #3.  Super easy to make.  


1 Powdered Sugar A-1 card base using the vine insert.  Score and set aside
Cut 1 piece of vanilla c/s 4 13/16”x 3 7/8”
This will fit inside the card underneath flowers.  Just make sure when you glue these together not to get carried away with the glue. Mostly around the edges and little dots on the vines and flowers will be best. 
Set aside 
Now cut with powdered sugar the flower die. 
Add ur sentiment to your card wherever you want it to go. If you want to pop it up do it now. Then 
go on to adding ur flowers. 
Using the end of a pencil or something that you can press into the center to form the flat  flowers into standing up petals.  Be gentle. I use the eraser end of a pencil and my secret weapon and gently press into the center and that is easy.  After you do this to the flower centers set them aside.  Now cut a piece of kiwi c/s and about 1/4” by 3 inches.  This is how I make leaves.  I cut a ( ) but I connect them at the top and the bottoms to form a leaf.  Make any size you want by just adjusting the width. This is how I get all my leaves the same size.  
Now that you have ur leaves and flowers made go back to you card base and glue on top of each flat  flower a flower and 3 leaves.  
When you feel you have enough you are done with you card. 
Super simple card 
******

Card #5 A2 size card  8 1/2” x4 1/4” score @ 5 1/2” 


This is the only A2 card I made. 
Cut 1 A2 size card base - I used Powdered Sugar c/s

Cut 1 piece of powdered sugar c/s 4” x 5 1/4”

Using masking tape I masked off the colors about 1” apart all the way down the paper.    I used cantaloupe, sunshine, & blueberry.  
I then put TSOL Adhesive on the back of some Powered Sugar c/s and cut the vine and flower die and colored the vines with kiwi, green apple and artichoke.  Save the frame from around it. 
Color the vines and flowers..my vines were green apple, kiwi, and artichoke…my flowers were cantaloupe and strawberry.   It them apart and glue them down onto the top 1/2 of your card.  Then add the flowers.  
Now  the white frame from around the vines and flowers you just cut…  I  colored it strawberry with my TSOL makers.  Lay it down evenly on the front of your paper.  I then added ribbon from ur kit and a bow. Cut out of the paper pad some tiny pockets stamped with “A Little Pocket Hug” and popped it up
 (in between the strawberry border )using dimensional tape.  I triple die cut the word die “Yippee” using TSOL adhesive sheets and put the 3 together for dimension and placed it on top of the ribbon.  Now I added the cloud and the centers to the flowers. I used the blue rhinestone center included in the card kit and 3’d ink pen.  
The inside I decorated it with a pocket some left over flowers and  sentiment from the Pockethugs2stamp set. The little word hug I hand wrote and put it as if it was connected to the pocket.  

Here are my 5 cards from the Yippee card kit.  I hope you post the cards you make so we can all see them.  

    Enjoy πŸ’•
Cheryl


TSOL Design Team November Card Kit Cards

Chris Lawlor  

https://youtu.be/8uqe4YvlEhk

Michelle 

https://instagram.com/cositosbymichelle?utm_medium=copy_link


New month New releases

 Hi EveryoneπŸ’• Can you believe it’s already July?  This year is just flying by so quickly…and with a New month The Stamps of life has releas...